Oops! Something went wrong while submitting the form.
Notice: It looks like you are visiting us from United Arab Emirates or have selected it as your residency location.
For accurate information and services under the correct licensed entity, please visit the appropriate section of our website. For more information view Regulatory Information
For accurate information and services under the correct licensed entity, please visit the appropriate section of our website. For more information view Regulatory Information
For educational purposes only, not investment advice.
An order block is a zone where large institutional orders once clustered, leaving a footprint that can act as future support or resistance. If you have heard that order blocks are "where institutions trade" but still cannot tell which zones are real or when to enter, this guide gives you a repeatable, step-by-step process and two worked examples. The goal is clarity: fewer messy price areas, fewer chase entries, and rules-based execution. It is educational, not a set of signals or a promise of profit.
The guide opens with a tight definition of the two main types of order blocks and how they differ from generic supply and demand. The three-step process follows: consolidation, displacement, and a retest that breaks structure. The scenarios then apply it twice, once bullish on forex and once bearish on Bitcoin, with entry, stop, and target logic grounded in market structure and risk management.
[[aa-key-takeaways]]
Key Takeaways
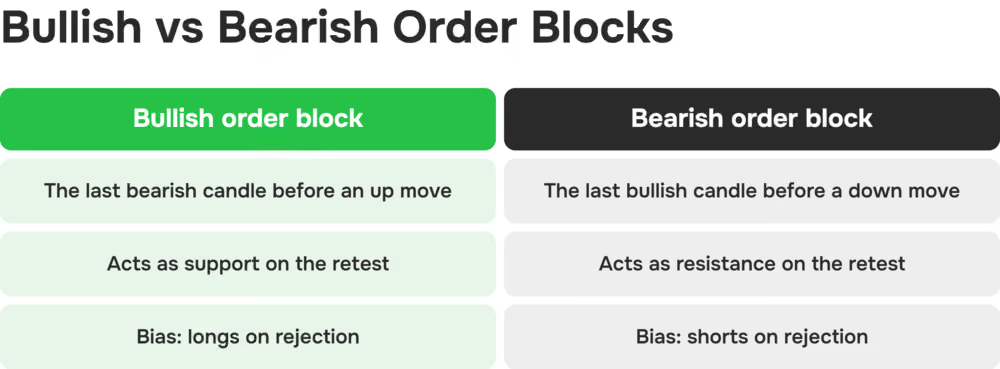
An order block is the last opposing candle before a strong impulsive move: a bullish block is the final bearish candle before price surges; a bearish block is the final bullish candle before a sharp downward move.
A valid order block needs three things: prior consolidation, an impulsive breakout with real momentum, and a break of structure, also called a market structure shift, on the retest to confirm participation.
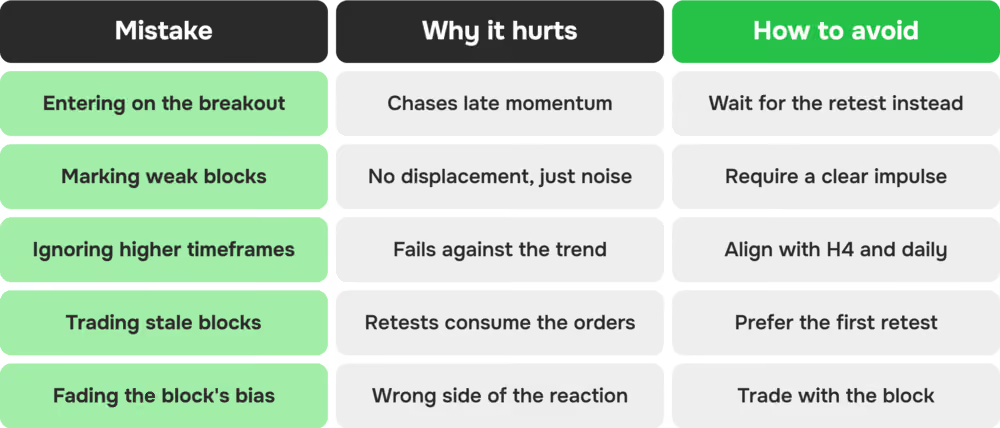
Higher timeframes such as H4 and the daily chart tend to reveal these price zones more reliably; entries can be refined on the 15-minute or 1-hour chart once the block is validated.
Trading an order block means waiting for price to return to the zone and show rejection in the intended market direction; entering on the initial breakout without a retest raises the risk of a false signal.
A block loses validity when price closes decisively through it, or after repeated retests consume the resting orders.
[[/a]]
[[aa-cta]]
Trade Smart-Money Zones Across Markets
Spot order blocks on forex, indices, commodities, and crypto from B2PRIME's unified cross-collateral account, with native TradingView charting.
An order block is a tight zone where institutional traders placed large orders, which later tends to act as support or resistance levels. In its simplest terms, it is the last candlestick before price moves away sharply, marking where big orders likely sat.
The institutional logic is that, unlike retail traders, large players cannot fill size instantly without moving price against themselves. Hence, their buy orders or sell orders cluster in a small area and leave a visible footprint. Explained this way, an order block is nothing mysterious. It needs no moving averages or other indicators, just the price action origin of a strong move that price may respect again.
Order Blocks Explained vs Supply and Demand Zones
In technical analysis, order blocks and generic supply/demand zones are often confused. The difference lies in confirmation. Where a supply and demand zone can form from any consolidation, an order block requires impulsive follow-through and a structural break. In practice, an order block is a stricter, higher-quality subset, tied to displacement and a break of structure rather than one of the many support and resistance zones drawn on a chart. Our deeper guide to forex order blocks expands on this.
How to Identify a Valid Order Block
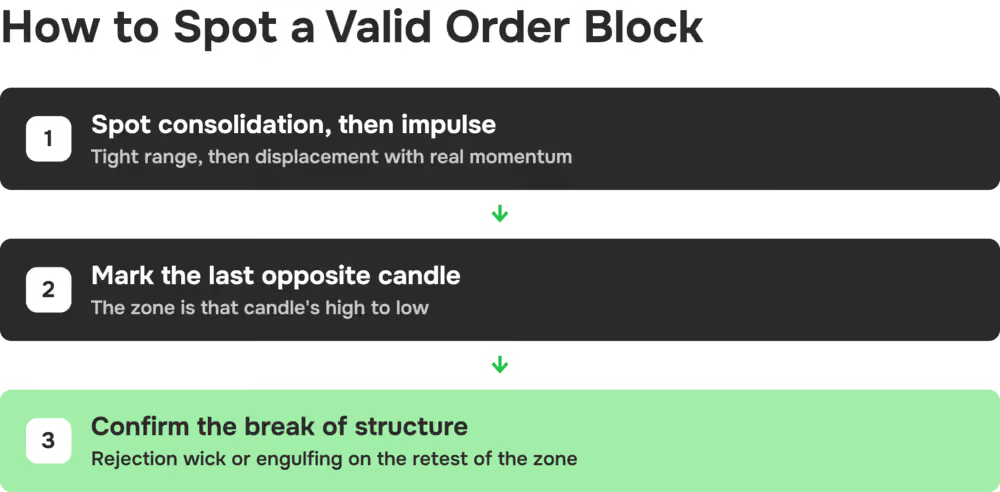
Knowing how order blocks form, and how to find one, comes down to a three-step process applied to any chart. Skipping a step raises the odds of trading an invalid block.
1. Spot Consolidation Then Impulse
First, find consolidation: a tight range of overlapping candles with muted momentum. Then look for impulse, or displacement: large-bodied candles with small wicks driving decisively in one direction. A quick visual check is three or more tight candles followed by a candle whose body is roughly twice the recent average. Choppy follow-through, weak momentum, or an immediate reversal without displacement signals an invalid candidate.
2. Mark the Last Opposite Candle
Mark the final bearish candle before a bullish impulse, or the final bullish candle before a bearish impulse. Define the zone as that candle's high to low, with an optional refinement to the candle body for tighter entries. The order block is not the whole consolidation, only the single candle immediately before the displacement.
3. Confirm Break of Structure on the Retest
A break of structure (BOS) is simply price printing a higher high (bullish) or a lower low (bearish) after the displacement. On the retest, confirmation signals include a rejection wick, an engulfing candle, or a lower-timeframe BOS aligning with the block's direction and the wider market context. Displacement also tends to leave a fair value gap (FVG) just beyond the block, an imbalance many traders watch alongside the zone itself.
Entering without confirmation often leads to avoidable losses. The logic ties back to order flow, because resting orders sitting in the zone tend to produce a visible reaction when price returns to them. These ideas overlap with liquidity sweeps and buy-side and sell-side liquidity.
Bullish and Bearish Order Block Examples
Both examples below are hypothetical and illustrative, meant to show the three-step process, not to recommend a trade. The steps are identical in forex trading and on Bitcoin; what changes is how wide the zone and the stop end up being.
Bullish Order Block Example on a Forex Pair
Consider a hypothetical H4 GBP/USD chart. Price consolidates in a tight range of five to eight candles around a round number, then breaks sharply higher on a strong impulse of roughly 150 pips. Mark the last bearish candle before that impulse, high to low, as the bullish order block. Later, price returns into the zone, prints a rejection wick (or a bullish engulfing candle), and resumes upward. That rejection is the entry trigger.
Illustrative trade setup:
Entry: after the rejection confirms inside the zone
Stop-loss: below the order block's low
Target: the next structural high / liquidity level
Risk-reward: about 1:2
If price closes back through the block, the idea is done, and the stop takes you out at the size you chose.
Bearish Order Block Example on Bitcoin
Now a hypothetical daily BTC/USD chart. Price ranges below a key level for several sessions, then displaces sharply lower into a bearish trend. Here the block is the last bullish candle before the drop. On the retest, price revisits the zone and prints a bearish engulfing candle (or a clear rejection) as confirmation.
Crypto moves faster, so the same 1% risk buys a smaller position with a wider stop. The crypto tools show recent ranges to size that stop against.
Illustrative trade setup:
Entry: after the bearish rejection confirms at the zone
Stop-loss: above the order block's high
Target: the next structural low / liquidity level
Risk-reward: about 1:1.5 or better
The stop marks where the idea is wrong, and no order block guarantees a reaction.
Common Mistakes When Trading Order Blocks
Trade Order Blocks on a Transparent, Fast Broker
An order block read is only as good as the real-time execution behind the retest, which can resolve quickly. B2PRIME is a multi-regulated broker with neutral tier-1 execution and transparent, published conditions. Its unified cross-collateral account covers forex, metals, indices, commodities, Crypto Spot, and Crypto Perpetual Futures in one balance, so the same order block trading strategy applies whether the block is on GBP/USD or Bitcoin, on TradingView, cTrader, or B2TRADER.
These trading concepts sit within the wider family of ICT trading strategies and smart money concepts (SMC). The mechanics of resting institutional orders are described in this overview of the order book.
[[aa-cta]]
Execute Retests With Low, Transparent Costs
RAW pricing starting at $2.50 per lot per side, zero minimum deposit, fast, automated withdrawals, subject to standard checks, with every condition published in full.
CFDs are complex instruments and come with a high risk of losing money rapidly due to leverage. You should consider whether you understand how CFDs work and whether you can afford to take the high risk of losing your money. Crypto CFDs carry additional risks due to the high volatility of the underlying assets.
This content is for informational and educational purposes only and does not constitute investment advice or a personal recommendation. B2PRIME (B2B Prime Services EU Ltd) is authorized and regulated by the Cyprus Securities and Exchange Commission (CySEC), license no. 370/18.
[[/a]]
[[aa-faq]]
FAQs about Order Block Trading
What does an order block look like on a chart?
It looks like the last candle in one direction just before a strong move in the other direction. For a bullish block, it is the final bearish candle before a sharp rally into an uptrend; for a bearish block, the final bullish candle before a sharp drop into a downtrend. The zone is drawn from that candle's high to low, and price often reacts to it on a later retest.
What timeframe is best for trading order blocks?
Higher timeframes such as H4, daily, and weekly tend to reveal more reliable order blocks, because larger institutional activity is clearer there. Many traders identify the block on a higher timeframe, then refine the entry on a 15-minute or 1-hour chart once the zone is validated.
How do I know when an order block is no longer valid?
A block loses validity when price closes decisively through it rather than reacting, or after several retests that likely consume the resting orders, a process known as mitigation. As a rule of thumb, the first or second retest tends to be cleaner than later ones, and once price breaks decisively beyond the zone, the idea is invalid. A zone that flips and holds from the other side afterward is usually called a breaker block.
Do order blocks work on crypto?
Yes. Order blocks appear on crypto spot and perpetual futures as they do on forex and indices, because price movements everywhere reflect how orders cluster and then clear. Crypto's higher volatility usually calls for wider stops and stricter position sizing to avoid being wicked out of an otherwise valid idea.
[[/a]]
Connect with Our Experts
Our team is equipped to provide solutions precisely to your requirements. Let's explore your options and discuss how we can support your objectives



.svg)