Oops! Something went wrong while submitting the form.
Notice: It looks like you are visiting us from United Arab Emirates or have selected it as your residency location.
For accurate information and services under the correct licensed entity, please visit the appropriate section of our website. For more information view Regulatory Information
For accurate information and services under the correct licensed entity, please visit the appropriate section of our website. For more information view Regulatory Information
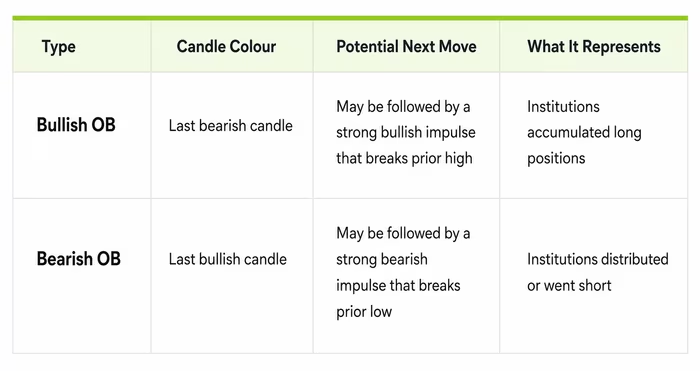
An order block is the last opposing candle before a strong impulsive price move — the specific zone where institutional traders accumulated or distributed positions. That definition is the foundation of order block trading, and understanding it can change how price action is read.
When price reverses from levels that appear arbitrary on a chart, the zone may be an order block. Large participants — banks, prop desks, prime brokers — cannot fill entire positions in a single tick. They stage entries across a price range, often disguised as a brief countertrend candle before a sharp directional surge. That candle is the order block.
This article covers what order blocks are, how to identify valid ones, and how to build a rules-based execution framework around them. Order blocks are a core component of Smart Money Concepts (SMC) — and of broader ICT trading strategies — but this guide stays focused: identification rules, execution steps, and two worked examples.
[[aa-cta]]
For educational purposes only — not investment advice.
[[/a]]
[[aa-key-takeaways]]
Key Takeaways
An order block is the last opposing candle before a strong directional move, marking where institutional traders built positions that price may revisit.
A valid order block requires three confirmations: market structure alignment (Break of Structure or Change of Character), strong displacement away from the zone, and unmitigated status.
Identification follows three steps — spot the impulsive move, mark the last opposing candle, refine the zone to the 50–100% range of the candle body.
The practical trading framework covers two entry methods (limit order vs. confirmation candle), stop-loss placement below or above the block, and structure-based profit targets at a minimum 1:2 risk-to-reward.
Order blocks apply across forex, crypto spot, crypto perpetual futures, and CFDs — execution speed and spread quality matter when trading these precision zones.
[[/a]]
What Is an Order Block in Trading?
An order block is the last bearish candle before a bullish impulse — or the last bullish candle before a bearish impulse — representing the zone where smart money placed large directional orders. For a deeper look at how these zones appear specifically across forex pairs, see B2PRIME's full breakdown of forex order blocks.
Order blocks differ from basic support and resistance because they point to a specific candle rather than a broad price area. Institutions need to accumulate or distribute positions without moving the market against themselves, so they stage entries into countertrend flow. The resulting candle — often absorbed by retail stop-outs — is the order block.
Bullish vs. Bearish Order Blocks at a Glance
Order blocks appear across all liquid markets — forex majors, equity indices, crypto, and commodities. They are not a magic indicator; they are a price action framework for reading where large orders likely sat and where price may return to engage them again.
[[aa-cta]]
Assessing institutional zones before trading Traders assessing order block entries may consider TradingView's direct-execution workflow, available through a B2PRIME Raw Account — $2.50/lot per side commissions, fast execution, and withdrawals processed promptly.
Have you ever wondered why price reverses at levels that look meaningless on a standard indicator? The answer may be institutional order flow.
Large participants cannot enter the market the way retail traders do. In a global foreign exchange market trading $9.6 trillion per day, even a fraction of institutional order flow can shift a major pair by several pips. A fund moving significant size into EUR/USD cannot place a single market order without moving price against itself. Instead, institutions stage entries in clusters — often during periods of retail selling into which they absorb liquidity. That staged buying leaves a footprint: the order block candle.
This connects directly to the Accumulation-Manipulation-Distribution (AMD) cycle — a core framework in ICT trading. The order block candle often marks the tail end of accumulation — the last moment price moved against the institutional direction before the real move began.
Order blocks function as liquidity footprints. Price revisits them because unfilled portions of institutional orders may still be resting at those levels, or because the zone represents a natural rebalancing point in price delivery. These zones are sometimes treated as high-probability areas, not guaranteed reversal points. The potential advantage comes from structural logic and discipline, not from marking every opposing candle.
Rules for a Valid Order Block
Not every opposing candle qualifies. Applying filters is what separates high-probability order blocks from noise. Skipping validation leads to trading recycled or structurally invalid zones, which may fail more frequently than properly confirmed blocks.
1. Align With Market Structure
A valid order block must directly precede a Break of Structure (BOS) — a higher high in an uptrend or a lower low in a downtrend. Without a structure break, the zone has no institutional confirmation and should be treated with caution. A Change of Character (CHoCH) can also qualify when identifying the start of a new trend leg.
Example: If EUR/USD breaks above 1.0850 with a strong impulsive candle sequence, the last bearish candle before that break is your bullish order block candidate. No structure break, no valid block.
2. Look for Strong Displacement
Displacement is a rapid, aggressive move away from the order block — typically three or more directional candles with minimal overlap. Weak, grinding moves suggest retail flow rather than institutional commitment.
Volume is a secondary confirmation. A volume spike on or near the order block candle adds validity. Where volume data is unavailable (most CFD instruments), rely on the quality of the displacement candles. Slow, overlapping follow-through reduces the setup's conviction.
3. Confirm the Block Is Unmitigated
Mitigation means price has already returned to and traded through the order block zone. Once mitigated, the block may lose its relevance — the resting orders have been absorbed. Checking mitigation status before each trade is recommended. Traders may mark mitigated blocks differently (graying them out or removing them) to reduce confusion.
Recycled order blocks — zones price has already revisited — fail at significantly higher rates than fresh, unmitigated blocks.
4. Avoid Recycled Blocks and Other Common Mistakes
Common errors that degrade order block performance:
Trading order blocks against the higher-timeframe trend — always confirm the higher-timeframe bias first.
Ignoring news events — major economic releases can invalidate technical zones instantly.
Marking every opposing candle without checking for structure breaks.
Using order blocks in isolation — confluence with Fair Value Gaps, liquidity pools, or key support/resistance levels increases probability.
[[aa-cta]]
Execute precision setups without latency drag B2PRIME's fast execution and direct TradingView integration may support tighter order block entries.
The identification process may be applied across various liquid markets and timeframes.
1. Spot the Impulsive Move
Scan for sequences of three or more directional candles that break prior highs or lows. The move must break structure — a directional run that doesn't clear a meaningful swing point is not displacement. Traders may start on H4 or Daily for clarity, then refine on H1 or M15 once the impulse has been confirmed. Overlapping, corrective-looking candles may indicate a weaker setup.
2. Mark the Last Opposing Candle
Backtrack from the start of the impulse to the last candle of the opposite colour. That candle serves as the initial order block candidate. Define the zone using the candle body (open to close). Include wicks only when the displacement move is exceptionally strong. Use rectangle or zone tools on TradingView or cTrader to mark the level — a clean visual reference matters when price approaches the zone under live conditions. TradingView's Pine Script environment also lets you build detection indicators that auto-highlight order block zones as you scan timeframes.
3. Refine the Zone to the 50–100 Percent Range
Institutional entries tend to cluster in the upper portion of a bullish order block candle body — roughly the 50–100% retracement of the candle body — and the lower portion of a bearish block. A Fibonacci retracement anchored to the candle body (open and close as anchor points) may be used to define the refined zone.
The trade-off: tighter zones offer better entries and smaller stops but may miss entries if price only taps the lower portion of the block. Some practitioners may prefer the refined 50–100% zone for a potentially improved risk-to-reward.
[[aa-cta]]
One account. Four markets. Institutional-grade fills. Trade forex, crypto spot, crypto perpetual futures, and CFDs from a single cross-collateral B2PRIME account.
Identifying the zone is preparation. Execution is where the setup may perform as expected or result in a stop-out. Precision matters — a wide spread or a slow fill can turn a valid order block setup into a losing trade.
1. Entry Trigger Options
Traders less familiar with the approach may consider starting with the confirmation candle method. It sacrifices some risk-to-reward but reduces the chance of entering a zone that price moves straight through. Limit orders at the 50% level may become more practical once traders are consistent at reading displacement and mitigation.
2. Stop-Loss Placement
Stop-loss placement is commonly set below the order block low (bullish setup) or above the order block high (bearish setup). Managing stop-loss and take-profit orders at the structural level is the foundation of disciplined order block risk management. If price trades through the entire block, the zone is invalidated — there is no reason to hold.
Some traders aim to limit risk to 1–2% of account equity per trade, though individual risk tolerance and circumstances vary. Order block setups can be high-probability when all conditions align, but no technical zone is immune to sudden macro catalysts or liquidity sweeps.
3. Profit-Taking Targets
Traders may target the next structural level: the prior swing high or low, an opposing order block, or a visible liquidity pool. A minimum 1:2 risk-to-reward applies; 1:3 may be possible on swing setups with clear structural targets. Partial profit-taking at 1:2 (close 50% of the position) with the remainder running to 1:3 balances locking in gains against maximising the winner.
Order Block Trading Examples
Two worked examples using realistic but hypothetical price levels. The same logic applies across forex, crypto spot, crypto perpetual futures, and CFDs.
[[aa-cta]]
The following examples are purely illustrative and do not constitute investment advice, a recommendation to trade any specific instrument, or an indication of likely future results. Actual market conditions may differ materially from these hypothetical scenarios
[[/a]]
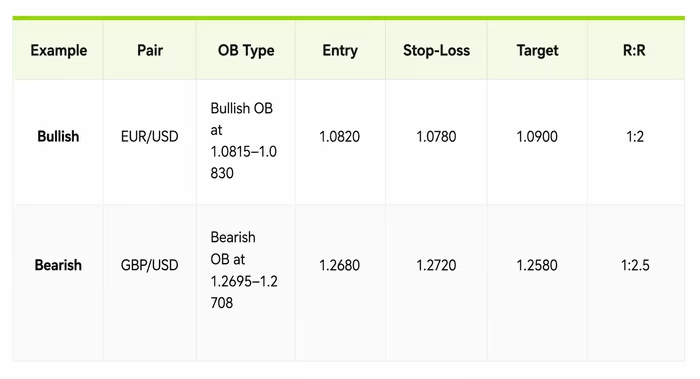
Bullish Order Block — EUR/USD: EUR/USD is in an uptrend on H4. Price breaks above 1.0850 (BOS confirmed). The last bearish candle before the impulse has an open at 1.0830 and close at 1.0800. The order block zone is 1.0800–1.0830, refined to the 50–100% range at 1.0815–1.0830. A limit buy at 1.0820. Stop at 1.0780 (below the block low). Target: liquidity high at 1.0900.
Bearish Order Block — GBP/USD: GBP/USD breaks below 1.2700 on H4 with strong bearish displacement (BOS confirmed). The last bullish candle: open at 1.2695, close at 1.2720. Refined zone: 1.2695–1.2708. A bearish confirmation candle prints at the zone. Entry at 1.2680. Stop at 1.2720 (above the block high). Target: next structural low at 1.2580.
Trade Order Blocks on an Institutional-Grade Account
Order blocks provide a structural framework for reading where smart money may have entered the market. The edge comes from combining valid identification rules with disciplined execution — and from having the infrastructure to act on precision setups without introducing avoidable slippage or cost drag.
B2PRIME provides trading infrastructure that may support this type of execution:
$2.50/lot commissions vs. a commonly referenced $3.50 market benchmark — potentially tighter all-in cost on standard setups
~7ms average execution latency — designed to support fills at or near the level
TradingView direct execution — mark your order block zone, place the limit, and manage the trade in a single interface
Unified cross-collateral account — forex, crypto spot, crypto perpetual futures, and CFDs from one account without sub-account transfers
The same order block logic that works on EUR/USD H4 applies to BTC/USD perpetual futures or gold CFDs — same identification framework, same execution discipline, same account. Explore B2PRIME's cTrader extensions and cBots for traders who want to automate the identification and alerting process.
[[aa-cta]]
Apply order block trading across four asset classes Open a B2PRIME Raw Account for $2.50/lot commissions and TradingView direct execution.
What timeframe is best for beginners trading order blocks?
H4 and Daily timeframes are often considered more suitable because market structure tends to be clearer and false signals may be less frequent. Once you're consistent, you can refine entries on H1 or M15 using higher-timeframe levels as your directional anchor.
Can order blocks be coded into automated strategies?
Yes — order block logic can be automated in TradingView Pine Script or cTrader cAlgo, provided your rules precisely define structure breaks and mitigation status. The identification rules in this guide — BOS confirmation, displacement quality, unmitigated status, 50–100% zone refinement — are specific enough to translate into coded logic. Traders exploring automation can also benefit from direct TradingView execution workflows when supported.
Do order blocks work the same in crypto spot and CFD markets?
The core identification logic may be applied similarly in crypto spot and CFD markets. Crypto spot and perpetual futures, available to eligible clients under the Bahamian DARE regime where permitted and subject to jurisdiction restrictions, can be more volatile around these zones due to uneven liquidity depth. Position sizing and execution quality matter even more in those markets.
[[/a]]
Connect with Our Experts
Our team is equipped to provide solutions precisely to your requirements. Let's explore your options and discuss how we can support your objectives


.svg)